Disclosure: Any post may contain links to my shop or affiliate links, which means I may receive a commission from any purchase you make. All opinions about products I use are my own. Read the full disclosure and Privacy Policy HERE.
Pretty tablecloths are an indulgence of mine. When I saw this tablecloth at Target, I knew just what I wanted to do: turn this tablecloth into Christmas Pillow Covers. Tablecloths are a very affordable way to get a whole bunch of festive fabric!
And I knew just who I wanted to do it with – these tiny people. I always pick a Christmas craft to do with my girls and this project seemed perfect this year. (The littlest one is standing on a stool – she is a shorty like me.)
My assistants and I will take you through the easy steps of making pillow covers.
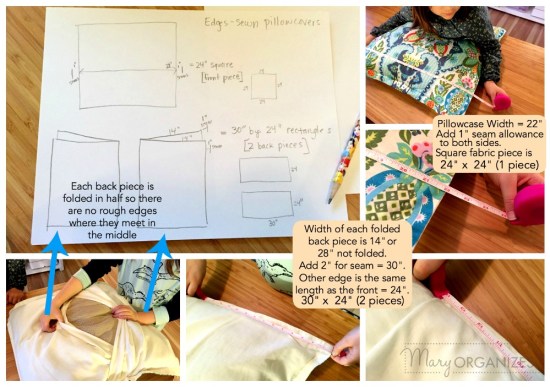
Step 1 – Figure out what pillow cover size you need. If you are using a firm 20″x 20″ pillow, you’ll need three pieces of fabric –
- 1 front piece – 24″x 24″
- 2 back pieces – 30″x 24″
If you have different sized pillows, you can see in this picture how I came up with those dimensions so you can figure out what dimensions you need. Even if your pillows are a different size, all the other steps are the same.
My pillows are the ones that came with the couch, I just cover them up. No need to buy a whole new pillow just for a different cover.
Step 2 – Cut your pieces. This is easiest to do with a cutting mat, but you can also make a pattern for yourself with paper or tissue paper. (I do not let my children use the rotary cutter, but they were helping me get the fabric setup on the table.)
Step 3 – Iron all the pieces. My girls loved ironing! The littlest one stood on a stool to iron so that she would be at a better angle.
Step 4 – Pin the layers together. Place the front piece down with the right side facing up. Fold each back layer in half and place on top of the front piece, one at a time, with the rough edges on the outer edge of the pillow cover. Pin/clip all the pieces in place.
Step 5 – Time to Sew! I used an erasable fabric pen to draw a line around the pillow about 1″ in from the side. I eyeballed it instead of measuring it because I knew my young girls would have a hard time eyeballing it while they sewed. When I sew these pillow covers, I do not draw a line.
Sew around the complete outer edge of the square 1″ in from the edge.
Step 6 – Turn outside right and pull out the edge and then iron it to make it sit flat.
Step 7 – Sew around the entire edge again 1″ from the edge. This stitch will be seen so pick a color that coordinates with your fabric. And that’s it, you’re done!
Up close, you might be able to tell that a child sewed it, but no one but me looks up close and to me it is an adorable reminder of a fun memory with my girls. Most people just see the awesome pillow.
The look great! Such a fun addition to our simple Christmas decor.
In honor of the pillows, I decided to write this blog post tonight sitting against these two pillows with warm fire going on this cold December day.
I hope you enjoy this tutorial! And I especially hope you enjoy your new Pillow Covers.
From my home to yours,
Mary


Thank you so much for sharing this Mary. I love the idea and I love that you did it with your girls 🙂 As you said great memories <3
Thank you, Diane! They really were fun and easy to make!
I love these pillows. What a clever idea – using a tablecloth. And I love that the girls helped make them. What a great memory for them. Much Love, Mom xoxoxo
Yes, they are very proud of their pillows!
Perfect idea for a pop of Christmas decor without adding clutter to your home. I have extra Christmas tablecloths that don’t get used, great recycling project. Thanks so much Mary! Merry Christmas!!
Yes, it does add such a fun Christmas color to the room. I think you will love turning your unused tablecloth into pillows!