Disclosure: Any post may contain links to my shop or affiliate links, which means I may receive a commission from any purchase you make. All opinions about products I use are my own. Read the full disclosure and Privacy Policy HERE.

Funny story. I showed Matt my post earlier this week where I said:
“This week I am going to be showing you how I recently re-organized my garage and I am happy to say that it is finally how I want it. Just like many of you, I have to compromise with someone else who lives here, but this time I said “I’m doing the garage my way, so unless you have any major objections … “. You know what? He has absolutely loved the “new” garage! It makes me wonder what I was really waiting for to give it that final touch. Hmmm.”
Well, then we had a hilarious discussion about how he had never had strong objections to making changes and getting rid of certain things. Ummm … I really do not know what took me so long to finally re-organize this garage. All I can say is I’m so glad we finally did it! And good thing he was on board, because installing the pegboard and adding/rearranging some of the wall stuff was much easier with his help.
You might have seen the way my garage used to be, there are many similarities to be sure. I didn’t fix what wasn’t broken! {You can see the old post HERE.} One thing you may notice is that I got rid of an entire shelf!
Now, without further ado …
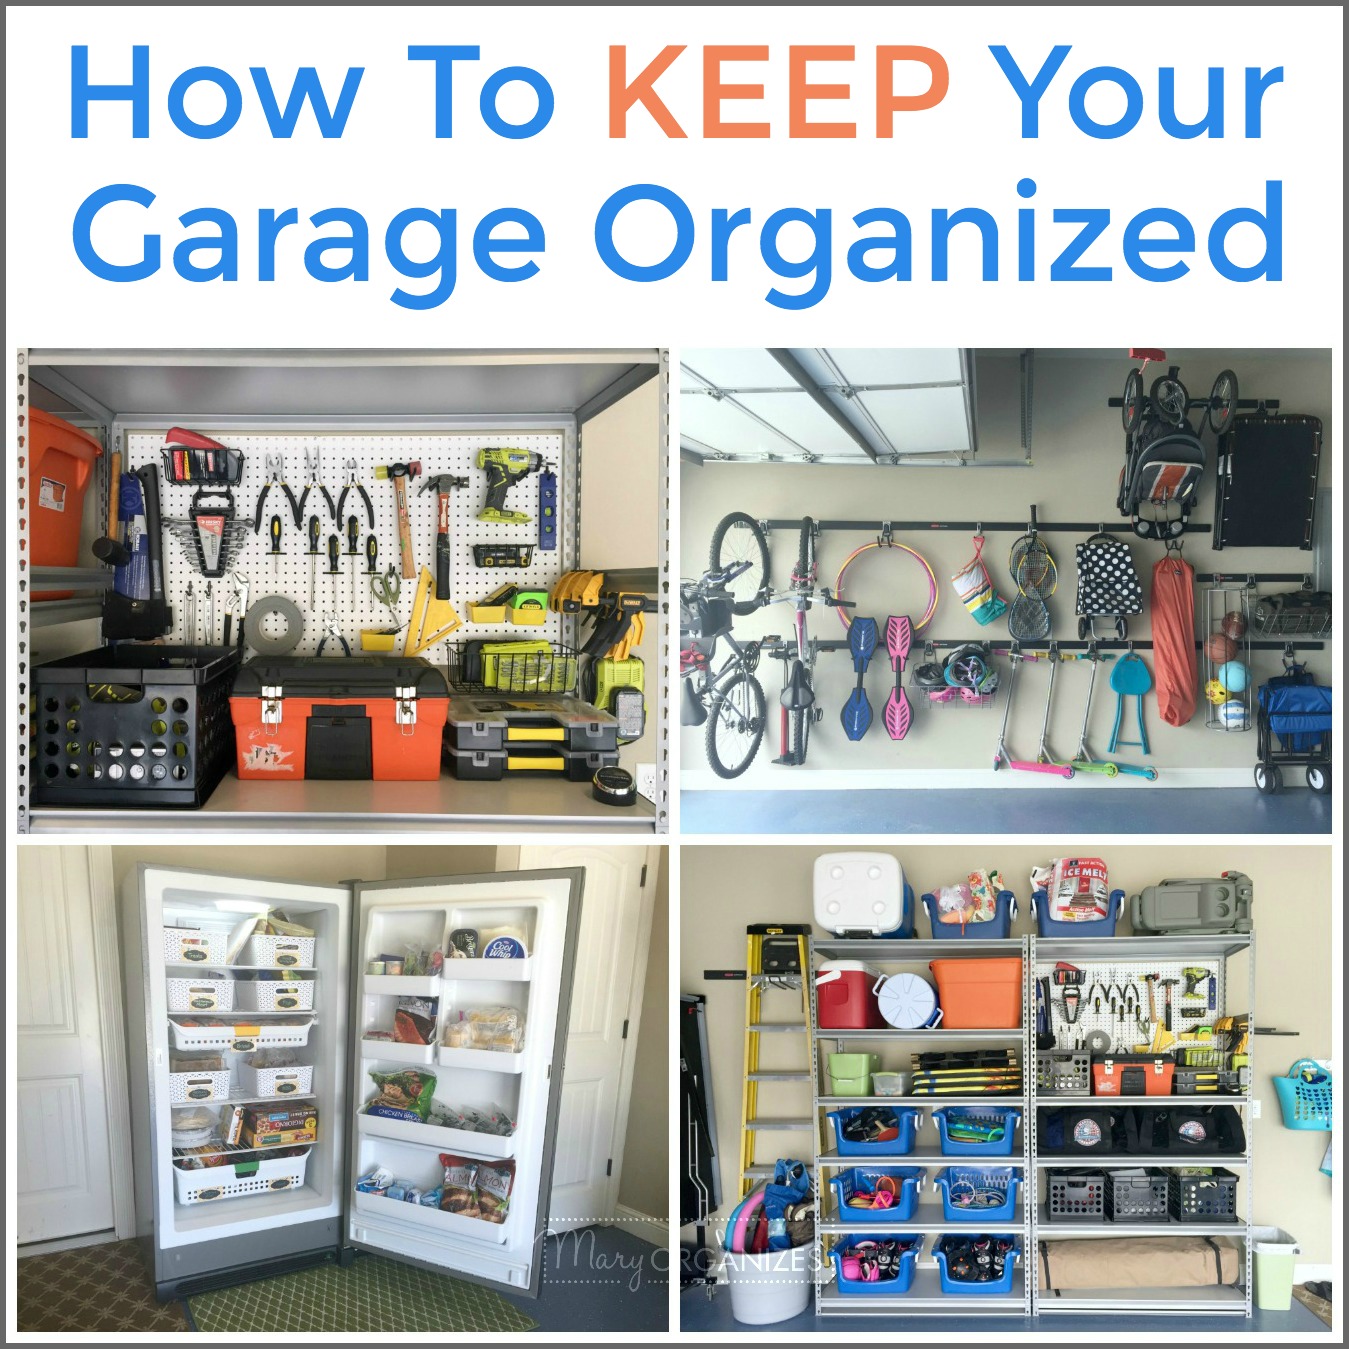
Welcome to our Garage!
I’ve tried to leave things as natural as possible so that you could see what it really looks like to have a functioning, organized garage for a family who uses their garage a lot. I could have staged everything to look like a magazine like some blogs do … but if you’ve read my blog for very long, you know that’s not my style! I want you to have good, realistic expectations so that you feel capable of making changes in YOUR garage!

Here is our sports stuff wall! I told you in THIS POST that I couldn’t hang all the bikes and vehicles … this is what is left on the floor. My 3 year old has a lot of riding toys and he uses them all! My favorite thing is when he turns his “truck” (aka. 4 wheeler toy) upside down and “fixes it”. I love him.

Here is that same wall without all the riding toys clogging the view (look, I staged the photo! Ha!). If you want to read the details about how/why I got all the sports equipment off the floor, read THIS POST.
During the re-organizing, I added a few tracks to my existing system. I extended it out towards the garage door and towards the opposite wall. I changed the one that holds the balls/ sports bag to a shorter track and used the longer track in a different spot.
I let myself say, if none of these tracks were already in the wall, where would I want them? Luckily, I wanted them mostly where they already were, but there were a few changes. Sometimes leaving a few holes in the walls isn’t the worst thing (especially when you can cover those up!).

I love the tracks up high to get some of this miscellaneous stuff out of my way. I pull the table stands out to use for projects and the beach chairs get used once a year (if I’m lucky) – they can be up high and reached with a step stool or ladder. I already have plans to replace that big stroller for a garden cart when it’s time to get rid of it.
The ping-pong table was a mammoth to figure out. All the different arrangements I was trying were just so visually weighty. It is just such a big thing that it can steal the mojo from the room if it isn’t positioned right. For a while we just had it in front of the three shelves (when there were three), and then we moved the third shelf over by the garage door (but now it is gone for good), and the ping-pong table was against the wall but still in full plain view. That was … better … but still not awesome.
I kept playing with it in my mind until I came up with this plan and it is works well! The table is turned parallel to the side wall so when I’m pulling in and out of my driveway, it doesn’t get all of my attention! But it is on wheels, so it can easily be pulled out and played still. And now I also have the space next to the shelf for other things, which has also been good.

The ladder was on the other side of the garage, but then I wanted to do things with the other area it was in and decided it could come fly solo over here. I like it here in the corner next to the shelf.

And you may remember that our camping chairs (though they should really be called soccer mom chairs) used to hang on the walls, but that was getting impractical. I got this inexpensive bin and loaded them all in. Oh, and pool noodles ended up in here too … I didn’t plan that, the kids just put it in there while they were out here with me and I thought “that works” and left them.
The best part of this bin is that when we need our chairs for a soccer game or BBQ or fireworks show or whatever, now all we have to do is pickup this bin and put it in the back of the minivan. Winning!

The garage shelves make me so happy every time I pass by them, they are just so simple to keep clean and organized. By simplifying them down so much, they just stay cleaner. It is awesome!!!
If you want to read all the details about the shelves, read THIS POST.

And of course, the coolest part of the shelves is the addition of the pegboard right where a shelf used to be. I can’t even tell you how this has made little jobs so much easier. I had to do a little fix inside the other day and I didn’t procrastinate at all, I just came and easily got to what I needed. Amazing! You really need to read THIS POST about the shelves.

While we were re-organizing, we moved the two remaining shelves left a foot or so. I wanted to have room for the garbage can that wasn’t directly under the things hanging. It’s the little things.
We put these hooks up a while ago, and I decided to leave them there because I love their versatility: towels in the summer and coats in the winter … and often a re-usable shopping bag waiting to go back in the car. Just being real.

You may have noticed the strange mismatched carpet thing happening here. The brown carpet I’ve had for a long time. I want to say at least 7 years. It came from our old house to this house. It was a very cheap indoor/outdoor rug that I bought because “it was the least tacky option from the $19.99 choices”. It has held up far better than I’d imagine for a cheap rug. The green rug used to be inside, but I replaced it and on the way to donating it, it found its way in front of the freezer and stayed. Now I love it there, because I will come get stuff out of the freezer barefoot sometimes and it’s nice to stay on carpet the whole time.

Yesterday I gave a full tour of how I organize my stand-up freezer. You can see that post HERE.
The little sink next to it comes in handy for especially muddy children or while I’m out here working on projects and gross-messy things.

I repositioned the tracks on this wall and added a new one. Over here I store the power-washer, blower, extension cords, extra chairs, and the Central Vac hose. I leave this spare hose plugged in to conveniently clean out the car whenever.
The bin below the Central Vac is my Donation Station.

On this side of the wall are all the pole-equipment items. I kind of did stage this picture, because I went to the backyard to get some of these so that the wall didn’t look bare! We have already begun our next big project and it’s in the garden this time.

If you want to see all the Garage Posts from Garage Week in one place, check out this post (and yes, I do find it ironic that I used a picture of my old garage wall for the image … what can I say? That picture has been shared around the internet a ba-zillion times and posted on many websites, sometimes without my permission. Even though I updated the garage, I think I’ll always remember this original wall fondly):

There is my garage. I hope you enjoy seeing it as much as I enjoyed showing you!!
Keep tuning in because tomorrow I’m going to talk about my tricks for KEEPING IT CLEAN!!!!
Be sure to check out all the other Garage Organizing Posts!
Garage Organizing Posts
Let’s Organize The Garage {Tips & Strategies} – An overview of the best strategies for approaching organizing your garage, with useful tips to make it go better.

Pegboard Hack & Organizing Garage Shelves – Ideas for organizing shelves and pegboards. Shelves are flexible to organizing lots of things, and pegboards are specifically excellent at organizing tools.

Garage Organizing: How To Hang Bikes, Scooters, Ripsticks, Balls & More – Use the vertical space in your garage and get all the pesky sports equipment off the floor and on the wall!

How To Organize A Stand-Up Freezer – Many people keep freezers in their garage. Let’s get those organized too!

My Re-Organized Garage REVEAL – I finally made the changed to make my garage a happy place for me! See all the nooks and crannies!

How To KEEP Your Garage Organized – You’ve worked hard to organize your Garage! Now it’s time to learn how to keep it that way!
Diagnose Your Garage & Cure The Clutter – This is an oldie, but goodie! Find out the different reasons people accumulate junk in their garage and diagnose YOUR REASON for a garage mess – then you’ll know how to clear the clutter.

From my home to yours,
Mary
I am using your rug idea in front of the freezer! I have an extra carpet runner and it will be a treat to my feet! Thanks again Mary. Have a great Memorial weekend.
Yes! Normally I would say donate the extra, but not if you could use it in front of your freezer!!!
Wow, I love how neat and orderly your garage is! I wish that could be possible in my garage, but it’s our only storage space (we don’t have any outbuildings and no attic). So, it has to house EVERYTHING! In addition to bikes for 5 children, tools, etc, we also have a riding lawn mower, push mowers (we have an acre to mow), garden equipment, off-season clothing, Christmas and seasonal decor, and it’s also the laundry area! But even though ours can never look as amazing as yours, I’m inspired to at least reorganize a bit! 🙂
It’s always good to do what you can. It already sounds like you are an amazing organizer to fit all of that in there!
Your garage looks great. Good job!!
I know you love it everytime you get in and out of your car.
You know I do!!
It’s so CLEAN! How do you keep it so nice?
Well, it isn’t so hard to keep it tidy, when everything has a place, and it gets cleaned during spring cleaning, but really … it looks so clean in this picture because I cleaned it before I took the picture. lol