• Skip to primary navigation
  • Skip to main content
  • Skip to primary sidebar
  • Home
  • Meet Mary
    • Hire-Me
    • Contact
    • Disclosure
  • Organize
    • Declutter
    • Clean
  • Challenges
  • Store

creatingmaryshome.com

Create a life you love.

September 16, 2014

The Year-Round Wreath

Disclosure: Any post may contain links to my shop or affiliate links, which means I may receive a commission from any purchase you make. All opinions about products I use are my own. Read the full disclosure and Privacy Policy HERE.


The Year-Round Wreath

I like to keep something festive on my door, but there are times when I’m not looking to celebrate something specific and just want something pretty. I am in love with hydrangeas at the moment and was itching to incorporate them into a wreath somehow, so I came up with a wreath design that would fit on my door anytime throughout the year. And I love it.

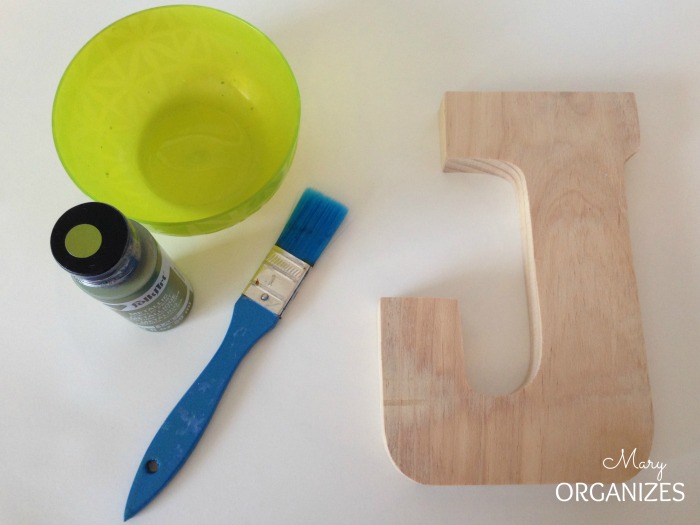
It was really easy to put together. I did it all in about 30 combined minutes, though I broke the tasks up to allow for drying paint. I did start with painting first, since I knew I’d have to wait for it to dry. I am in love with metallic acrylic paints right now.

I am in love with metallic acrylic paint

I suggest using thumb tacks on the back side to lift the letter up off the table. As you can see I forgot to do that at first, so I turned the letter over wet paint and all and then turned it back over and touched up the paint. I find it useful for getting around the bottom edge.

Use thumbtacks to keep the Letter off your table

If you want to be picky, you can make all of your brush strokes go in the same direction. Give it a bit to dry. It doesn’t take too long.

Paint the top and sides of the letter

Next I worked on the frame part of the wreath. I bought this aged wood frame from Hobby Lobby, but you could really use any frame you had lying around.

The wreath otherwise known as the frame

These are the hydrangeas I scored for 50% off.

These were the silk hydrangeas I used for the wreath

I used scissors to cut the fake flowers apart. Separating the leaves and the bouquet of flowers.

I cut the hydrangea bushes and the leaves off separately

I glued the leaves onto the frame to form a nest for the flowers. I used a glue gun for this.

I used glue to stick everything together

Here is what the nest looked like without the flowers:

I created a nest out of the silk leaves

Next I glued the hydrangea bouquets onto the leaf-nest. I used a lot of glue at the base of the bouquet.

I used a whole lot of glue to make the big flower stick

This part of the wreath came together very quickly.

I glued the three hydrangea bouquets into the nest

After the letter J dried, the wreath was ready to put together. I used a pencil to mark where I wanted holes in the frame and letter.

I marked with a pencil where I wanted a hole

I asked my assistant to help me drill holes in the frame and letter. He was kind enough to oblige.

I asked my favorite assistant to do the drilling

I tied together the letter and added a string to hang the wreath with hemp rope. Small, but durable.

I tied the letter into the top holes with hemp and tied a string to hang it

I added rubber stickers to the back so that the wreath/frame doesn’t scratch my front door.

I used little rubber backing stickers to make sure the wood doesn't scratch my door

The back is pretty ugly, but no one is going to see the back, so who cares?!

The back is very ugly but who would see the back

I probably need to stop saying this about my own projects, but I LOVE how it turned out. It fits my home and my style and I love it.

I love how looks and the way the J pops out

I love the way the J pops out in thickness and color.

The Wreath that works Year-Round

Do you have a different wreath for each season? What kind of wreaths are your favorite? There are so many varieties these days!!

From my home to yours,
Mary

Share this:

  • Click to share on Twitter (Opens in new window)
  • Click to share on Facebook (Opens in new window)
  • Click to share on Pinterest (Opens in new window)

Related

Filed Under: Create Mary 31 Comments

Reader Interactions

Teach Piano Lessons at Home {FREE Lesson Plan PRINTABLES}
Command Center & The School Lunch Menu Printable

Comments

  1. Tracy says

    September 16, 2014 at 7:10 am

    Beautiful!

    Reply
    • Mary says

      September 16, 2014 at 12:29 pm

      Thank you!

      Reply
  2. Carolyn Fisher says

    September 16, 2014 at 7:27 am

    I love the idea of using the frame for your wreath and just love the
    Hydrangeas. I am going to try my own wreath!,!

    Reply
    • Mary says

      September 16, 2014 at 12:29 pm

      Awesome! Good luck! It really was so easy. I just realized that I forgot a picture in the steps of the leaves all glued on without the flowers on yet. I’ll add that now in case it helps. πŸ™‚

      Reply
  3. karen127 says

    September 16, 2014 at 7:39 am

    Very nice!

    Reply
    • Mary says

      September 16, 2014 at 12:29 pm

      Thank you!

      Reply
  4. Patty says

    September 16, 2014 at 8:29 am

    Love it.

    Reply
    • Mary says

      September 16, 2014 at 12:30 pm

      Thank you so much! Me too!

      Reply
  5. Sonja Bobo says

    September 16, 2014 at 8:50 am

    I think your year round wreath is so cute !!

    Reply
    • Mary says

      September 16, 2014 at 12:30 pm

      Thanks, Mom!

      Reply
  6. Kate Hertlein says

    September 16, 2014 at 9:00 am

    Fabulous outcome!!

    Reply
    • Mary says

      September 16, 2014 at 12:30 pm

      Thank you!

      Reply
  7. Courtney DeBose says

    September 16, 2014 at 10:41 am

    Love! So easy, I think I may give this a try!!!

    Reply
    • Mary says

      September 16, 2014 at 12:30 pm

      You definitely should!

      Reply
  8. Diane says

    September 16, 2014 at 12:24 pm

    This is so beautiful Mary. Thank you for taking the time to share step-by-step directions with us.

    Reply
    • Mary says

      September 16, 2014 at 12:31 pm

      You’re welcome! And Thank you!

      Reply
  9. Sandra Kelly says

    September 16, 2014 at 3:12 pm

    I love it! Great idea that turned out beautiful!

    Reply
    • Mary says

      September 17, 2014 at 8:47 am

      Thank you!

      Reply
  10. Tiffany says

    September 16, 2014 at 8:04 pm

    Super cute! Love the combo of elements.

    Reply
    • Mary says

      September 17, 2014 at 8:47 am

      Thank you so much!

      Reply
  11. cstoufflet says

    September 17, 2014 at 7:36 am

    Turned out pretty great!

    Reply
    • Mary says

      September 17, 2014 at 8:48 am

      Thanks for your brainstorming help! πŸ™‚

      Reply
  12. Tracy says

    September 18, 2014 at 11:16 am

    What size is the frame?

    Reply
    • Mary says

      September 18, 2014 at 1:20 pm

      11×14 I think …

      Reply
  13. shelley says

    September 18, 2014 at 1:50 pm

    SOO pinning this!! cute for inside or outside!!

    Reply
  14. nadira says

    September 21, 2014 at 1:03 pm

    Why the letter is J?

    Reply
    • Mary says

      September 22, 2014 at 10:22 am

      You can make it any letter you want, I chose J. πŸ™‚

      Reply
  15. nancy carlson says

    February 28, 2015 at 9:01 pm

    Definitely a nice and generic wreath. Love the weathered wood. Everything is so simple and uncluttered. Great job.
    Here is a wreath base I like. I keep giving them away, so it’s time to make another one.
    http://itsomuchfunwatchingod.blogspot.com/2013/10/recycled-plastic-bag-wreath.html

    Reply
    • Mary says

      February 28, 2015 at 11:37 pm

      Thanks so much for stopping by to comment. And I checked out your wreath. It is awesome. Thanks for sharing!

      Reply
      • nancy carlson says

        February 28, 2015 at 11:52 pm

        And thank you for checking out my wreath! Glad you like it. πŸ™‚

        Reply
        • Mary says

          March 1, 2015 at 9:35 am

          Of course!

          Reply

Leave a Reply Cancel reply

Your email address will not be published. Required fields are marked *

Recipe Rating


This site uses Akismet to reduce spam. Learn how your comment data is processed.

Primary Sidebar

Search

About Mary

Welcome! You are in the right place if you want to get organized! I love helping my clients and readers create functionally beautiful homes. Our homes should be sanctuaries – a place to Read More…

Newsletter

Thank you! Look for a confirmation email from us immediately. If you don't see it soon, check your Spam Folder!

Subscribe to get my emails and receive a FREE Printable Calendar.

Connect

Shop

Featured Posts

Favorite Things

© 2017 Creating Mary's Home · Powered By: MaryORGANIZES.com


Loading Comments...